
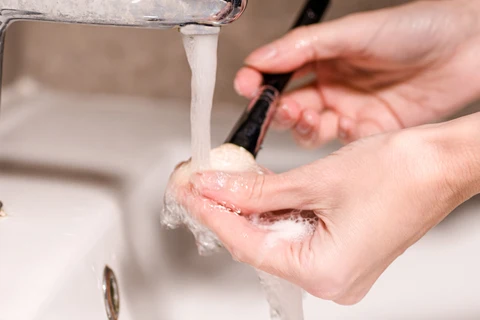
Makeup brushes are essential tools for applying foundation, concealer, blush, eyeshadow, and other beauty products. However, every time you use a brush, it can collect makeup residue, oil, dead skin cells, and environmental dirt. If brushes are not cleaned regularly, this buildup can affect how makeup applies and may contribute to skin irritation or hygiene problems.
The good news is that cleaning makeup brushes does not require expensive equipment or special skills. With a gentle cleanser, lukewarm water, and a clean towel, you can remove product buildup and keep your brushes in better condition.
Whether you use a few brushes for everyday makeup or own a complete collection, learning how to clean and dry them properly can help you maintain your tools, improve makeup application, and avoid unnecessary waste.
In this guide, you will learn how often to clean different makeup tools, which cleaning products to use, how to wash brushes step by step, how to clean blending sponges, and which mistakes to avoid.
1. Why Is It Important to Clean Makeup Brushes?
Makeup brushes come into contact with your skin repeatedly. During use, they collect traces of foundation, powder, concealer, natural skin oils, and dead skin cells. Over time, this residue can accumulate between the bristles.
Cleaning your brushes regularly helps remove this buildup and supports better makeup application.
It helps makeup apply more evenly. Old foundation and powder can make bristles stiff or clumpy. A clean brush generally distributes product more smoothly and makes blending easier.
It reduces product buildup. Cream and liquid products can accumulate inside dense brush heads. Removing the residue helps keep the bristles flexible and easier to use.
It supports good hygiene. Used brushes can carry microorganisms, particularly when they remain damp or are stored in dirty conditions. Regular cleaning and complete drying help maintain cleaner tools.
It may help reduce avoidable irritation. Residue, old product, and contaminated tools may contribute to irritation for some people. Keeping brushes clean is especially important if you have sensitive skin or use brushes around your eyes.
It can help extend the life of your brushes. Makeup residue can make bristles stiff and difficult to reshape. Gentle washing and proper drying can help preserve their condition.
However, clean brushes cannot guarantee that you will never experience breakouts or irritation. Skincare products, cosmetics, skin conditions, and other factors can also affect your skin.
2. How Often Should You Clean Your Makeup Brushes?
The ideal cleaning schedule depends on how frequently you use your brushes, which products you apply with them, and whether you share them with anyone else.
As a practical starting point, use the following schedule and adjust it to your needs.
| Makeup tool | Suggested cleaning frequency |
|---|---|
| Foundation and concealer brushes | About once a week with regular use |
| Cream blush and contour brushes | About once a week, or when product builds up |
| Powder and blush brushes | Every 1–2 weeks, depending on use |
| Eyeshadow brushes | About every 1–2 weeks, with more frequent cleaning when needed |
| Brushes used around sensitive eyes | Clean more frequently, especially if irritation occurs |
| Makeup sponges | Ideally after each use, or as frequently as practical |
| Brushes used by multiple people | Clean and sanitize appropriately between users |
These are general guidelines rather than strict medical rules. If you wear makeup daily, have oily or acne-prone skin, or notice visible residue, you may need to wash your brushes more often.
Brushes used for liquid or cream products often need more frequent cleaning because these formulas can leave substantial residue. Powder brushes may accumulate product more slowly, but they still need regular washing.
If you have an eye infection or an active skin infection, avoid using potentially contaminated tools and follow appropriate healthcare advice about cleaning or replacing them. Do not share brushes that touch the eyes or face.
3. What Do You Need to Clean Makeup Brushes?
You do not need a professional brush-cleaning kit to clean most everyday makeup brushes. A few basic household supplies are usually enough.
Gather the following items before you begin:
- A gentle liquid cleanser suitable for cosmetic brushes
- Lukewarm water
- A small, clean bowl, if needed
- A clean towel
- A clean, flat surface or suitable drying rack
A mild, fragrance-free cleanser may be a useful option if you are sensitive to scented products. Some brush manufacturers also recommend specific cleaners, so check the care instructions when available.
Baby shampoo is commonly used for brush cleaning, but it is not automatically suitable for every brush or every person. Choose a gentle product that rinses away thoroughly and does not leave an oily residue.
Avoid harsh household cleaners, strong solvents, and products that could damage the bristles or leave irritating residue behind.
You also do not need to buy a textured silicone cleaning mat. It can help loosen stubborn makeup, but your clean palm or fingers are often sufficient.
4. Step-by-Step Guide to Cleaning Makeup Brushes
Follow these steps to clean most synthetic or natural-fiber makeup brushes gently.
Step 1: Wet the Bristles
Hold the brush with its bristles pointing downward under a gentle stream of lukewarm water.
Try to wet the bristles without soaking the handle or allowing much water to enter the metal or plastic section that connects the bristles to the handle. This section is called the ferrule.
Water trapped near the ferrule may weaken the adhesive or damage some brush handles over time. Keeping the handle as dry as possible helps protect the brush’s construction.
Avoid using very hot water, which may damage adhesives, certain fibers, or the finish of the handle.
Step 2: Apply a Small Amount of Cleanser
Place a small amount of suitable brush cleanser in your palm or a clean bowl.
You do not need a large amount of soap. Start with a little and add more only if the brush contains heavy product buildup.
If you are cleaning several brushes, work with one brush at a time so you can rinse each one thoroughly.
Step 3: Gently Work Out the Makeup
Swirl the damp bristles gently in the cleanser. You can also move them in small circles across your palm to loosen foundation, powder, or other residue.
Use light pressure and avoid crushing the brush head or pulling at the bristles.
For dense foundation brushes, you may need to repeat the process several times. If the cleanser becomes heavily colored, rinse the brush and apply a little fresh cleanser.
Avoid rubbing aggressively, as this can cause bristles to spread, bend, or fall out.
Step 4: Rinse Thoroughly
Hold the bristles under lukewarm running water, keeping them pointed downward.
Gently move the bristles with your fingers so water can reach the inner part of the brush head. Continue rinsing until the water runs clear and no visible soap remains.
If the brush still feels slippery or produces foam, rinse it again. Soap residue may affect the feel of the bristles and could irritate the skin.
Do not force water into the ferrule or soak the entire brush in a bowl.
Step 5: Remove Excess Water
Turn off the water and gently squeeze the bristles between your clean fingers.
Next, press the brush into a clean towel to absorb extra moisture. Do not twist the bristles or pull them sharply.
Use your fingers to reshape the brush head into its original form. This helps the brush dry evenly and retain its intended shape.
Step 6: Dry the Brush Properly
Lay the brush flat on a clean, dry towel or drying surface. Ideally, position the brush head slightly over the edge of a counter or table so air can circulate around the bristles.
Keep the brush in a well-ventilated area away from excessive humidity.
Avoid standing wet brushes upright with the bristles pointing upward because water may travel toward the ferrule and weaken the adhesive. Do not place them in a closed drawer or makeup bag while damp.
Allow the brushes to dry completely before using or storing them. Depending on their size, density, and the humidity in your room, drying may take several hours or longer.
Important: A brush can feel dry on the surface while moisture remains deep inside a dense brush head. Give thick brushes enough time to dry all the way through.
5. How to Clean Makeup Sponges Properly
Makeup sponges, including blending sponges, require slightly different care from brushes. They absorb liquid foundation, concealer, and other products, so residue can remain inside the sponge even when the outside looks clean.
Ideally, clean your reusable makeup sponge after each use.
Here is a simple method:
- Wet the sponge thoroughly with lukewarm water until it expands.
- Apply a small amount of cleanser suitable for the sponge.
- Gently squeeze the sponge repeatedly to work the cleanser through the material.
- Rinse it under clean water while continuing to squeeze.
- Repeat until the water runs clear and the sponge no longer feels soapy.
- Press it gently into a clean towel to remove excess moisture.
- Leave it in a clean, ventilated place to air-dry completely.
Avoid twisting, pulling, or aggressively squeezing the sponge, as this may damage the material.
Do not store a damp sponge in a sealed container or closed makeup bag. Moisture can encourage microbial growth, particularly when the sponge is stored without enough airflow.
Even with regular cleaning, reusable sponges do not last forever. Replace one if it develops persistent odor, visible mold, unusual discoloration, tears, or a texture that no longer returns to normal after washing.
If you cannot clean a sponge thoroughly or are unsure whether it is still hygienic, replacing it is the safer option.
6. How to Clean Foundation and Concealer Brushes
Foundation and concealer brushes often need extra attention because liquid and cream products can cling to their bristles.
Start by removing excess product from the brush with a clean tissue before washing. This can reduce the amount of residue that needs to be rinsed away.
Next, use a gentle cleanser and lukewarm water. Work the cleanser through the bristles without pushing water into the ferrule.
Dense, flat-top, and rounded foundation brushes may require more rinsing than loose powder brushes. Check the center of the brush head carefully, since foundation can remain trapped between the inner bristles.
If the brush still feels sticky after washing, repeat the gentle cleaning process rather than using a stronger household cleaner.
After rinsing, reshape the brush and dry it flat with good airflow.
Cleaning these brushes regularly is especially helpful if you use liquid foundation every day. A clean brush can also make it easier to apply thin layers of foundation without leaving streaks or patches.
For better results, combine clean tools with a foundation shade and formula that suit your skin. You can read our guide on how to choose the right foundation shade for additional makeup tips.
7. How to Clean Eyeshadow Brushes Safely
Eyeshadow brushes need regular cleaning because they are used close to the eyes. Powder, cream eyeshadow, eyeliner residue, and skin oils can accumulate on their bristles.
Use a gentle cleanser and wash each brush carefully, making sure the product is rinsed away completely.
If you use several eyeshadow colors, cleaning your brushes between colors can also help prevent unwanted mixing. For example, a brush that still contains dark brown eyeshadow may alter a pale pink shade.
For a quick color change between applications, a clean, dry brush or a suitable brush-cleaning tool may help remove loose powder. However, quick cleaning between colors is not a replacement for washing.
If you experience eye irritation or an eye infection, stop using potentially contaminated eye makeup tools. Do not share eye brushes, and consider replacing tools that cannot be cleaned adequately.
Avoid using strong-smelling or irritating cleaning products on brushes that touch the eyelids. Rinse thoroughly and allow the brush to dry completely before it comes near your eyes again.
8. Common Makeup Brush Cleaning Mistakes to Avoid
Even when you clean your brushes regularly, the wrong technique can shorten their lifespan or leave residue behind.
Using very hot water: Hot water can damage certain bristles, weaken adhesive, or affect brush handles. Lukewarm water is generally a better choice.
Soaking the entire brush: Prolonged soaking may allow water to enter the ferrule or handle. Clean the bristles without submerging the entire brush.
Pulling or twisting the bristles: Aggressive handling can loosen fibers and permanently change the brush shape. Use gentle circular motions and light pressure.
Leaving soap behind: Inadequate rinsing may leave the brush feeling stiff or slippery. Rinse until the water runs clear and the bristles feel clean.
Using harsh cleaners: Strong household detergents, solvents, and unsuitable cleaning products may damage brush materials or leave unwanted residue. Use a suitable gentle cleanser.
Drying brushes with high heat: Hairdryers on high heat, radiators, and other direct heat sources may damage fibers or adhesive. Air-drying is generally preferable.
Storing brushes while damp: Moisture trapped in a makeup bag or closed drawer can create an environment where unwanted microorganisms grow. Let brushes dry completely before storage.
Cleaning only when brushes look dirty: Some residue is not immediately visible. Follow a regular cleaning schedule instead of relying only on appearance.
Ignoring the brush handle: Makeup residue can collect where the bristles meet the ferrule and on the handle. Wipe the handle with a suitable damp cloth when needed, while keeping excess moisture away from the ferrule.
9. How to Store Makeup Brushes After Cleaning
Proper storage helps keep clean brushes in good condition between uses.
Once the bristles are completely dry, place your brushes in a clean holder, organizer, or makeup container. Keep them away from dust, moisture, and direct contact with dirty surfaces.
If you store brushes upright, make sure they are fully dry and arrange them so the bristles are not crushed against one another.
Avoid placing clean brushes directly beside used sponges or dirty tools. Keeping clean and used items separate reduces the chance of transferring residue back onto freshly washed brushes.
If you travel frequently, use a clean brush case that protects the bristles. Wash or wipe the case periodically, especially if it collects powder or foundation residue.
Do not close damp brushes inside a travel pouch immediately after cleaning. If you need to pack them before they have dried, wait until they are fully dry first.
10. When Should You Replace Your Makeup Brushes?
Regular cleaning can help maintain your brushes, but it cannot restore every damaged tool.
Consider replacing a brush if you notice any of the following:
- Bristles continue falling out in large amounts.
- The brush head has become permanently misshapen.
- The handle is cracked or the ferrule is loose.
- The bristles remain stiff or sticky after thorough washing.
- The brush has a persistent unpleasant odor.
- There is visible mold or contamination that cannot be safely removed.
A few loose fibers do not necessarily mean a brush needs replacing, particularly if it is new. However, significant shedding or structural damage can make it difficult to apply makeup evenly.
There is no universal replacement schedule for every brush. Quality, frequency of use, cleaning technique, and storage conditions all affect how long a brush lasts.
If a brush is damaged or cannot be cleaned adequately, replacing it is preferable to continuing to use it simply because you want to avoid waste.
11. A Simple Weekly Makeup Brush Cleaning Routine
If you often forget to clean your makeup tools, adding the task to your weekly routine can make it easier to maintain.
You could follow this simple schedule:
After each use
- Remove obvious excess makeup when appropriate.
- Keep used brushes separate from clean tools.
- Clean reusable blending sponges as soon as practical, ideally after use.
Once a week
- Wash foundation and concealer brushes.
- Clean brushes used frequently with cream or liquid products.
- Inspect your eye brushes and wash them when needed.
Every one to two weeks
- Wash regularly used powder, blush, and eyeshadow brushes, adjusting the schedule according to buildup and frequency of use.
At the end of each cleaning session
- Remove excess water gently.
- Reshape the bristles.
- Allow every tool to dry completely.
- Store clean tools in a dry, clean place.
You can adjust this routine to suit the number of brushes you own. If you only use two or three brushes, cleaning them regularly may take just a few minutes.
Conclusion
Cleaning your makeup brushes properly is a simple habit that can improve makeup application, reduce product buildup, and support better cosmetic hygiene. You do not need expensive equipment; a suitable gentle cleanser, lukewarm water, and proper drying are usually enough for everyday brushes.
Wash foundation and concealer brushes regularly, clean powder brushes according to how often you use them, and pay particular attention to tools used around your eyes. Reusable makeup sponges need frequent cleaning and complete drying because they absorb product and moisture.
Most importantly, avoid soaking brush handles, using harsh cleaners, or storing tools while damp. Inspect your brushes from time to time and replace any that are damaged or cannot be cleaned properly.
A few minutes of care can help keep your makeup tools ready for your next routine and make applying your favorite products easier and more comfortable.
This article is for general information and is not medical advice. See our Disclaimer for details.